
Item Shop Mod(s): NPC + Item Display + Tooltips
Today we're going to modifying classes/class_itemshop.php, specifically the display() function. This guide comes in two parts. The first part will be a total modification of your item shops to display an NPC, with random text, and an overhaul of how items are displayed, complete with tooltips. The second part is just the item display overhaul, for those uninterested in having an NPC run your shops.
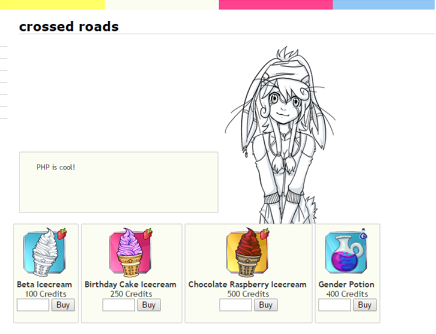
Let's start by showing you what you'll be making (if you change nothing), on the default Main theme Mysidia comes with, to prove it should work with any thee. After this, I'll give you the code as-is. Then I'll make an attempt at explaining in the code in greater detail. The code already comes commented, but if you're looking to build things to your exact specifications, it is my hope that the further reading will give you the details you need.
Let's start by showing you what you'll be making (if you change nothing), on the default Main theme Mysidia comes with, to prove it should work with any thee. After this, I'll give you the code as-is. Then I'll make an attempt at explaining in the code in greater detail. The code already comes commented, but if you're looking to build things to your exact specifications, it is my hope that the further reading will give you the details you need.
We'll be replacing the display function in classes/class_itemshop.php:
 Spoiler: Our new display() function!
You'll notice in the screenshot above that the items don't appear to have a description with them. This is because I'm also going to help you install nifty tooltips!
PHP:
    public function display(){
        $mysidia = Registry::get("mysidia");
        $document = $mysidia->frame->getDocument();
        $document->addLangvar($mysidia->lang->select_item);

        if($this->gettotal() == 0){
            $document->addLangvar($mysidia->lang->empty);
            return FALSE;
        }

        # Choose the NPC image based on the name of the shop
        switch ($this->shopname) {
            case "Crossed Roads":
                $npc_img = "http://fc00.deviantart.net/fs71/f/2014/262/a/2/base_npc_60_by_kyttias-d7zqrnf.png";
                #Based on the random number, sets a quote for $npc_text
                $num = Rand (1,6);
                switch ($num) {
                        case 1: $npc_text = "Time is money."; break;
                        case 2: $npc_text = "Isn't icecream super?"; break;
                        case 3: $npc_text = "Welcome to {$this->shopname}!"; break;
                        case 4: $npc_text = "Off to see the wizard?"; break;
                        case 5: $npc_text = "Tomorrow is another day..."; break;
                        case 6: $npc_text = "PHP is cool!"; }
                break;
            case "Spectrum":
                $npc_img = "http://fc00.deviantart.net/fs70/f/2014/313/a/c/base_npc_2_60_by_kyttias-d85ww5k.png";
                #Based on the random number, sets a quote for $npc_text
                $num = Rand (1,6);
                switch ($num) {
                        case 1: $npc_text = "Time is money."; break;
                        case 2: $npc_text = "Isn't icecream super?"; break;
                        case 3: $npc_text = "Welcome to {$this->shopname}!"; break;
                        case 4: $npc_text = "Off to see the wizard?"; break;
                        case 5: $npc_text = "Tomorrow is another day..."; break;
                        case 6: $npc_text = "PHP is cool!"; }
                break;
            default;
                $npc_img = "http://placekitten.com/g/200/500";
                $npc_text = "Welcome to {$this->shopname}!";
                break;
        }

        # let's begin rendering the page
        $document->add(new Comment("
            <style>
                .s_top {
                  overflow:hidden;
                  display: block;
                }
                .sc_npc_text{
                  width: 300px;
                  float: left;
                  position: relative;
                  height: 70px;
                  padding: 15px;
                  margin: 10px;
                  margin-top: 180px;
                  font-family: 'Trebuchet MS', Helvetica, sans-serif;
                  overflow: auto;
                }
                .sc_npc_img{
                  width: 40%;
                  float: left;
                }

                .sc_item {
                  display: inline-table;
                  padding: 5px;
                  text-align: center;
                  font-family: 'Trebuchet MS', Helvetica, sans-serif;
                  font-size: 14px;
                  margin-bottom: 3px;
                }
                .s_panel {
                  border-radius: 2px;
                  border: 1px solid #CCC;
                  background-color: #FBFDF2;
                }
            </style>
            <!-- START Container for Text and NPC -->
                <div class='s_top s_container'>
                    <div class='s_panel sc_npc_text'>{$npc_text}</div>
                    <div class='sc_npc_img'><img  src='{$npc_img}' height='300'></div>
                </div>
            <!-- END Container for Text and NPC -->
            <!-- START Container for Items -->
                  <div class='s_container'>
        ", FALSE));

        # Now render each item the store has
        foreach($this->items as $stockitem){
              $item = $this->getitem($stockitem);

              #descriptions of the item functions
            switch ($item->function) {
                case "Click1": $usage = "<br/><b>use:</b> Feed a pet to give them {$item->value} EXP."; break;
                case "Click2": $usage = "<br/><b>use:</b> Feed a pet to set their EXP to {$item->value}."; break;
                case "Click3": $usage = "<br/><b>use:</b> Resets EXP earned today to 0."; break;
                case "Level1": $usage = "<br/><b>use:</b> Raises the Level of your pet by {$item->value}."; break;
                case "Level2": $usage = "<br/><b>use:</b> Sets the Level of your pet to {$item->value}."; break;
                case "Level3": $usage = "<br/><b>use:</b> Makes your pet Level 0 again!"; break;
                case "Gender": $usage = "<br/><b>use:</b> Swaps the gender of your pet to its opposite!"; break;
                default;
                    $usage = "";
                    break;
            }

            # Now let's render each item icon, name, price and tooltip
            $document->add(new Comment("
                <div class=\"s_panel sc_item\">
                <img rel=\"tooltip\" title=\"{$item->description} <em>{$usage}</em>\" src=\"{$item->imageurl}\"/><br/>
                  <b>{$item->itemname}</b>
                  <br/>
                  {$item->price} {$mysidia->settings->cost}<br/>
                ", FALSE));


            # Building the Buy form
            $buyForm = new FormBuilder("buyform", "../purchase/{$mysidia->input->get("shop")}", "post");
            $buyForm->setLineBreak(FALSE);
            $buyForm->buildPasswordField("hidden", "action", "purchase")
                    ->buildPasswordField("hidden", "itemname", $item->itemname)
                    ->buildPasswordField("hidden", "shopname", $shop->shopname)
                    ->buildPasswordField("hidden", "shoptype", "itemshop")
                    ->buildPasswordField("hidden", "salestax", $shop->salestax);
            $quantity = new TextField("quantity", "1");
            $quantity->setSize(3);
            $quantity->setMaxLength(3);
            $quantity->setLineBreak(FALSE);
            $buy = new Button("Buy", "buy", "buy");
            $buy->setLineBreak(FALSE);
            $buyForm->add($quantity);
            $buyForm->add($buy);

            # Actually adding in the Quantity field Buy button now
             $document->add($buyForm);

            # Now we finish off the item by closing its div
            $document->add(new Comment("</div>", FALSE));
        }

        # And that's a wrap
        $document->add(new Comment("</div><!-- END Container for Items -->", FALSE));

    }  #END display function
You'll notice in the screenshot above that the items don't appear to have a description with them. This is because I'm also going to help you install nifty tooltips!
In your directory where Mysidia is installed there is a css folder (not talking about anything theme-related in the template folder, this css folder is the one at the root). We're going to add this as tooltip.css -
Spoiler: tooltip.css
A nearby folder, also in the heart of things, is called js. Open up this folder and add this as tooltip.js:
Spoiler: tooltip.js
Now, in your theme's header.tpl, add in these lines (before the end of the </head>, of course):
Spoiler: Inside header.tpl:
You now have all the necessary components for tooltips. You now also have jQuery, for future reference. If you already had jQuery, say, at the end of your </body> in your template.tpl (and if you have Bootstrap, you do), move the scripts there instead (but go ahead and leave the css in the header). These scripts must always come after your jQuery installation.
You'll notice I also have tab-related things in the above. This is because your profile tabs will have broken, and this will fix it. So now, to finish fixing up the tabs, open up inc/tabs.php and delete the contents (but not the file).
Using Tooltips:
To make tooltips elsewhere on your site, from now on, all you need to do is add title="Contents of the tooltip here!" rel="tooltip" to any element you want to have a tooltip. Could be links, divs, spans, images, etc. You can also use some basic html inside them, such as italicies, bold, and linebreaks.
For more reference on the tooltip system I just had you install, visit this link.
HTML:
#tooltip
{
    text-align: center;
    color: #fff;
    background: #111;
    position: absolute;
    z-index: 100;
    padding: 15px;
}

    #tooltip:after /* triangle decoration */
    {
        width: 0;
        height: 0;
        border-left: 10px solid transparent;
        border-right: 10px solid transparent;
        border-top: 10px solid #111;
        content: '';
        position: absolute;
        left: 50%;
        bottom: -10px;
        margin-left: -10px;
    }

        #tooltip.top:after
        {
            border-top-color: transparent;
            border-bottom: 10px solid #111;
            top: -20px;
            bottom: auto;
        }

        #tooltip.left:after
        {
            left: 10px;
            margin: 0;
        }

        #tooltip.right:after
        {
            right: 10px;
            left: auto;
            margin: 0;
        }
A nearby folder, also in the heart of things, is called js. Open up this folder and add this as tooltip.js:
HTML:
/*
        TOOLTIP
    */

    $( function()
    {
        var targets = $( '[rel~=tooltip]' ),
            target  = false,
            tooltip = false,
            title   = false;

        targets.bind( 'mouseenter', function()
        {
            target  = $( this );
            tip     = target.attr( 'title' );
            tooltip = $( '<div id="tooltip"></div>' );

            if( !tip || tip == '' )
                return false;

            target.removeAttr( 'title' );
            tooltip.css( 'opacity', 0 )
                   .html( tip )
                   .appendTo( 'body' );

            var init_tooltip = function()
            {
                if( $( window ).width() < tooltip.outerWidth() * 1.5 )
                    tooltip.css( 'max-width', $( window ).width() / 2 );
                else
                    tooltip.css( 'max-width', 340 );

                var pos_left = target.offset().left + ( target.outerWidth() / 2 ) - ( tooltip.outerWidth() / 2 ),
                    pos_top  = target.offset().top - tooltip.outerHeight() - 20;

                if( pos_left < 0 )
                {
                    pos_left = target.offset().left + target.outerWidth() / 2 - 20;
                    tooltip.addClass( 'left' );
                }
                else
                    tooltip.removeClass( 'left' );

                if( pos_left + tooltip.outerWidth() > $( window ).width() )
                {
                    pos_left = target.offset().left - tooltip.outerWidth() + target.outerWidth() / 2 + 20;
                    tooltip.addClass( 'right' );
                }
                else
                    tooltip.removeClass( 'right' );

                if( pos_top < 0 )
                {
                    var pos_top  = target.offset().top + target.outerHeight();
                    tooltip.addClass( 'top' );
                }
                else
                    tooltip.removeClass( 'top' );

                tooltip.css( { left: pos_left, top: pos_top } )
                       .animate( { top: '+=10', opacity: 1 }, 50 );
            };

            init_tooltip();
            $( window ).resize( init_tooltip );

            var remove_tooltip = function()
            {
                tooltip.animate( { top: '-=10', opacity: 0 }, 50, function()
                {
                    $( this ).remove();
                });

                target.attr( 'title', tip );
            };

            target.bind( 'mouseleave', remove_tooltip );
            tooltip.bind( 'click', remove_tooltip );
        });
    });
Now, in your theme's header.tpl, add in these lines (before the end of the </head>, of course):
HTML:
{$header->loadStyle("{$home}{$css}/tooltip.css")}
<script src="//ajax.googleapis.com/ajax/libs/jquery/1.10.2/jquery.min.js"></script>
<script src="{$home}{$js}/tooltip.js"></script>
<script src="{$home}{$js}/tabs.js"></script>
<script>
$(function() { $("#profile").organicTabs(); });
</script>
You now have all the necessary components for tooltips. You now also have jQuery, for future reference. If you already had jQuery, say, at the end of your </body> in your template.tpl (and if you have Bootstrap, you do), move the scripts there instead (but go ahead and leave the css in the header). These scripts must always come after your jQuery installation.
You'll notice I also have tab-related things in the above. This is because your profile tabs will have broken, and this will fix it. So now, to finish fixing up the tabs, open up inc/tabs.php and delete the contents (but not the file).
Using Tooltips:
To make tooltips elsewhere on your site, from now on, all you need to do is add title="Contents of the tooltip here!" rel="tooltip" to any element you want to have a tooltip. Could be links, divs, spans, images, etc. You can also use some basic html inside them, such as italicies, bold, and linebreaks.
For more reference on the tooltip system I just had you install, visit this link.
Now, please take the time to check out the first bit of code I gave you, that new display function!
In place are two example shopkeeper NPCs. Please do not use these images and be ready to replace them with your own. My shop names are "Crossed Roads" and "Spectrum" - observe the code going on, it does have commentary! Replace these shop names with your own and don't be afraid to copy and paste to make room for more shops.
Each shopkeeper can say it's own set of random things. Can you see how there are six phrases, and a random number is being chosen between 1 and 6? Change as necessary.
Also, anywhere in a case, but before the break, you could also redefine the $npc_img. In this way, you could give your NPCs a variety of emotions, depending on their randomly selected phrase.
By default, if the script cannot find your shop's name on the list, it will display a cute kitten as a placeholder and a basic "Welcome to {$this->shopname}!". Feel free to keep on using this placeholder during your development. :3
Moving along, the page rendering will start to take place. $document->add(new Comment(" ... ")); will allow you to insert text to the current page. By default, there is a linebreak after comments inserted this way, so after each of my comments, you'll see I write FALSE to prevent this behavior, as it would produce undesired results while placing divs.
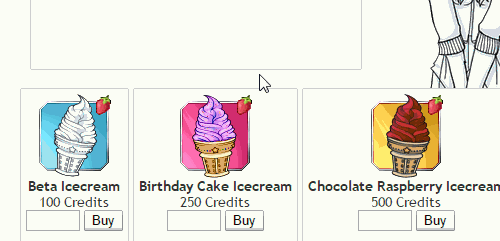
You'll see that I've inserted the css right there. Leave it, or move it to your own css file if it will be more convenient to you - the choice is yours. Adding width: 100px; to .sc_item will take longer titles down to multiple lines, but may increase the height of those item boxes. This may or may not be desired.
We're still inside the "new Comment" we're adding to the document, and you'll see that I'm adding divs just as easily as I would basic HTML. Take notice that we're inside double quotes, so the HTML must use single quotes when defining things like classes and inline styles. If double quotes are absolutely necessary, you can throw a backslash in front of them and they'll render as normal. Like this: \"This would be in double quotes.\"
Observe how the final page is rendered by visiting your shop and viewing the source (a right-click, Inspect Element anywhere in the shop area will get you in the approximate location). Because it's as easy as HTML inside these "new Comment" areas, go forth and be creative!
Our first "new Comment" ends with the start of a new div, which we'll close only after we've run a statement that will render the items, and we'll do that now.
This next bit opens up with a switch statement which will make the item function (as stored in the database) appear in a nice, plain text form that can be easily appended to the item description. It'll save you the trouble of including what an item does while writing the item's description! Not all item functions are included, so you'll want to append them with your own.
Now we're making the item. You'll see that I'm backslashes double quotes - this is so item descriptions that contain apostrophes will display without breaking anything! We wouldn't want that. <em> tags are just another way of doing italics. And, yes, some basic HTML does work inside the tooltips. {$mysidia->settings->cost} will automatically pull up the name of your site's currency, which can always be changed in the AdminCP or database.
Next the buy form is being built, added, and then the individual item's container is being closed.
Breaking out of this statement now, we'll close the div for the container that holds all the items.
If you wanted to, say, move your NPC to sit to the right of your items, you may want do your div work here, after the item containers have closed.
In place are two example shopkeeper NPCs. Please do not use these images and be ready to replace them with your own. My shop names are "Crossed Roads" and "Spectrum" - observe the code going on, it does have commentary! Replace these shop names with your own and don't be afraid to copy and paste to make room for more shops.
Each shopkeeper can say it's own set of random things. Can you see how there are six phrases, and a random number is being chosen between 1 and 6? Change as necessary.
Also, anywhere in a case, but before the break, you could also redefine the $npc_img. In this way, you could give your NPCs a variety of emotions, depending on their randomly selected phrase.
By default, if the script cannot find your shop's name on the list, it will display a cute kitten as a placeholder and a basic "Welcome to {$this->shopname}!". Feel free to keep on using this placeholder during your development. :3
Moving along, the page rendering will start to take place. $document->add(new Comment(" ... ")); will allow you to insert text to the current page. By default, there is a linebreak after comments inserted this way, so after each of my comments, you'll see I write FALSE to prevent this behavior, as it would produce undesired results while placing divs.
You'll see that I've inserted the css right there. Leave it, or move it to your own css file if it will be more convenient to you - the choice is yours. Adding width: 100px; to .sc_item will take longer titles down to multiple lines, but may increase the height of those item boxes. This may or may not be desired.
We're still inside the "new Comment" we're adding to the document, and you'll see that I'm adding divs just as easily as I would basic HTML. Take notice that we're inside double quotes, so the HTML must use single quotes when defining things like classes and inline styles. If double quotes are absolutely necessary, you can throw a backslash in front of them and they'll render as normal. Like this: \"This would be in double quotes.\"
Observe how the final page is rendered by visiting your shop and viewing the source (a right-click, Inspect Element anywhere in the shop area will get you in the approximate location). Because it's as easy as HTML inside these "new Comment" areas, go forth and be creative!
Our first "new Comment" ends with the start of a new div, which we'll close only after we've run a statement that will render the items, and we'll do that now.
This next bit opens up with a switch statement which will make the item function (as stored in the database) appear in a nice, plain text form that can be easily appended to the item description. It'll save you the trouble of including what an item does while writing the item's description! Not all item functions are included, so you'll want to append them with your own.
Now we're making the item. You'll see that I'm backslashes double quotes - this is so item descriptions that contain apostrophes will display without breaking anything! We wouldn't want that. <em> tags are just another way of doing italics. And, yes, some basic HTML does work inside the tooltips. {$mysidia->settings->cost} will automatically pull up the name of your site's currency, which can always be changed in the AdminCP or database.
Next the buy form is being built, added, and then the individual item's container is being closed.
Breaking out of this statement now, we'll close the div for the container that holds all the items.
If you wanted to, say, move your NPC to sit to the right of your items, you may want do your div work here, after the item containers have closed.
The switch statement where the NPC is chosen for the shop isn't necessary, the first three css properties aren't necessary, and you can delete everything from the START Container for Text and NPC to END Container for Text and NPC. Isn't commented code nice?
Alternatively, all you need is this:
PHP:
    public function display(){
        $mysidia = Registry::get("mysidia");
        $document = $mysidia->frame->getDocument();
        $document->addLangvar($mysidia->lang->select_item);

        if($this->gettotal() == 0){
            $document->addLangvar($mysidia->lang->empty);
            return FALSE;
        }

        # let's begin rendering the page
        $document->add(new Comment("
            <style>
                .sc_item {
                  display: inline-table;
                  padding: 5px;
                  text-align: center;
                  font-family: 'Trebuchet MS', Helvetica, sans-serif;
                  font-size: 14px;
                  margin-bottom: 3px;
                }
                .s_panel {
                  border-radius: 2px;
                  border: 1px solid #CCC;
                  background-color: #FBFDF2;
                }
            </style>
            <!-- START Container for Items -->
                  <div class='s_container'>
        ", FALSE));

        # Now render each item the store has
        foreach($this->items as $stockitem){
              $item = $this->getitem($stockitem);

              #descriptions of the item functions
            switch ($item->function) {
                case "Click1": $usage = "<br/><b>use:</b> Feed a pet to give them {$item->value} EXP.";
                    break;
                  case "Click2": $usage = "<br/><b>use:</b> Feed a pet to set their EXP to {$item->value}.";
                    break;
                  case "Click3": $usage = "<br/><b>use:</b> Resets EXP earned today to 0.";
                    break;
                  case "Level1": $usage = "<br/><b>use:</b> Raises the Level of your pet by {$item->value}.";
                    break;
                  case "Level2": $usage = "<br/><b>use:</b> Sets the Level of your pet to {$item->value}.";
                    break;
                case "Level3": $usage = "<br/><b>use:</b> Makes your pet Level 0 again!";
                    break;
                case "Gender": $usage = "<br/><b>use:</b> Swaps the gender of your pet to its opposite!";
                    break;
                default;
                    $usage = "";
                    break;
            }

            # Now let's render each item icon, name, price and tooltip
            $document->add(new Comment("
                <div class=\"s_panel sc_item\">
                <img rel=\"tooltip\" title=\"{$item->description} <em>{$usage}</em>\" src=\"{$item->imageurl}\"/><br/>
                  <b>{$item->itemname}</b>
                  <br/>
                  {$item->price} {$mysidia->settings->cost}<br/>
                ", FALSE));


            # Building the Buy form
            $buyForm = new FormBuilder("buyform", "../purchase/{$mysidia->input->get("shop")}", "post");
            $buyForm->setLineBreak(FALSE);
            $buyForm->buildPasswordField("hidden", "action", "purchase")
                    ->buildPasswordField("hidden", "itemname", $item->itemname)
                    ->buildPasswordField("hidden", "shopname", $shop->shopname)
                    ->buildPasswordField("hidden", "shoptype", "itemshop")
                    ->buildPasswordField("hidden", "salestax", $shop->salestax);
            $quantity = new TextField("quantity", "1");
            $quantity->setSize(3);
            $quantity->setMaxLength(3);
            $quantity->setLineBreak(FALSE);
            $buy = new Button("Buy", "buy", "buy");
            $buy->setLineBreak(FALSE);
            $buyForm->add($quantity);
            $buyForm->add($buy);

            # Actually adding in the Quantity field Buy button now
             $document->add($buyForm);

            # Now we finish off the item by closing its div
            $document->add(new Comment("</div>", FALSE));
        }

        # And that's a wrap
        $document->add(new Comment("</div><!-- END Container for Items -->", FALSE));

    }
You'll definitely need to read up on all the details in Section 2 regarding tooltips and installation of them.
Last edited:
")

 Forum Contains New Posts
 Forum Contains No New Posts